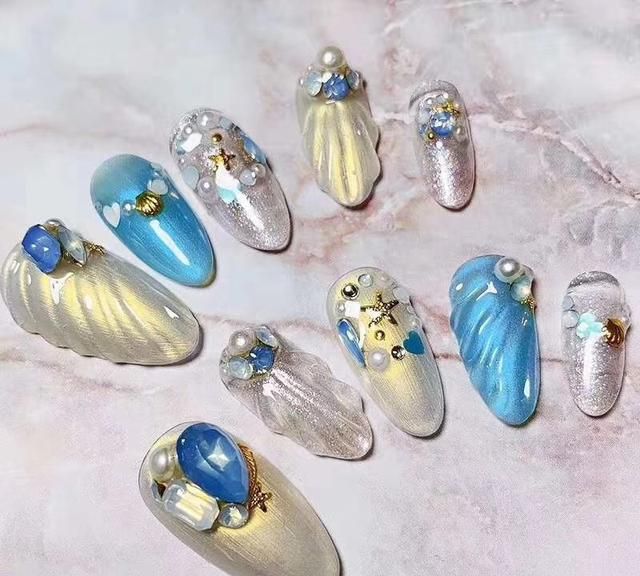
Going to a warm seaside holiday in summer is a very comfortable thing, and the manicure of a seaside holiday is naturally different from ordinary. It uses a lot of seaside elements, and the colors are light and beautiful. A holiday-style manicure will always give people a gentle and refreshing feeling, making girls feel as if they are on vacation. Share a shell manicure with multicolored color gradients, three-dimensional ripples, and pearl embellishments to replicate the feeling of the beach.

Trim the nails into a square circle, which is more in line with the pattern of the scallop shell. Put a layer of protective nail polish to separate the nails from the colored glue. Apply a layer of protective glue on the skin on the three sides of the nails to easily tear off the nail polish applied to the outside. Gradient colors choose light colors with beach elements. Apply three colors of yellow, blue and orange on the square sponge in turn, transfer to the nails, repeat twice until the nail polish is evenly colored. After it dries, remove the surrounding nail polish.
Dip the shell powder and apply it evenly on the nail surface. This special powder for nail art can create a laser light feel similar to shells. Choose the ivory white color number to perfectly blend with the background color. If you want to create the three-dimensional effect of the shell, you need carved glue. The transparent texture can be superimposed on the shell powder to create ripples. Draw several divergent woven threads longitudinally, and the changes in shades create a realistic texture visually, and the background color also appears to bend the lines.
Paste a white pearl on the bottom, like life bred in a shell. Add a layer of bright oil on the nail surface and this nail art is complete. Although this nail art has a very bright color, it does not make people feel complicated, because there are transparent ripples on the color, which will make the color much softer.

The very important thing about shell nail art is the texture of the three-dimensional glue, the moist and uniform transparency, and the beautiful lines in the final effect. This is a very exotic manicure, with a unique artistic sense, without being too exaggerated.
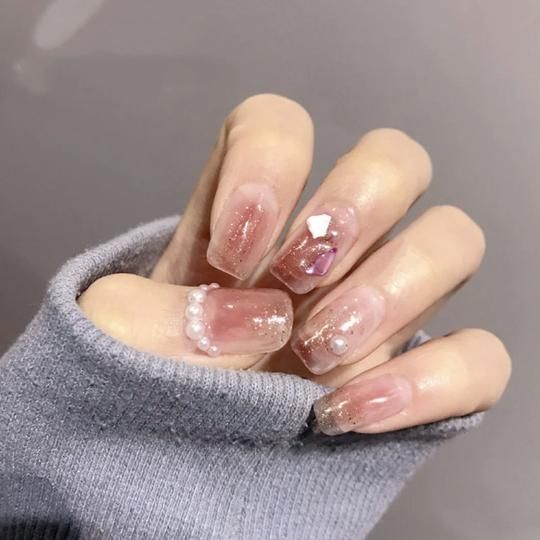
Simple shell nail tutorial
Step 1: prepare the nail glue and tools needed, trim the nails and polish the nail surface, apply the primer, and light for 60 seconds. Dip the pink nail polish with a hook line pen on the front edge of the thumb, index finger, and little finger to draw a circle, and light it for 60 seconds.
Step 2: Take out the sticker, put a metal wire sticker on the middle finger, as shown in the picture, and illuminate the lamp for 60 seconds.
Step 3: Take out the green, white, blue, yellow and pink shell paper
Step 4: Apply bright oil on the middle finger, stick green, white, blue, yellow and pink shell paper on the suitable position, and light the lamp for 60 seconds.
Step 5: Glue a short gold wire on the ring finger to form a triangle, and light it for 60 seconds.
Step 6: Apply a layer of bright oil on the ring finger, glue green, white, blue, yellow and pink shell paper on the triangle, and light it for 60 seconds.
Step 7: Dip the pink nail polish with a hook line pen on the blank part of the ring finger, and light it for 60 seconds.
Step 8: Apply glue on the thumb, index finger and pinky round French style, glue the golden rectangular rivets, and light for 60 seconds.
Step 9: Finally, apply a frosted seal on the top of the nail and light it for 60 seconds.